Setting up git code signing with a Yubikey
So you got yourself your first Yubikey and you want to use it to sign you git commits so that they are verifiably yours. Where do you even begin? This guide will help you setup your environment on Windows.
I got my Yubikey as a freebie when I subscribed to Wired (unfortunately this promotion no longer seems to be available). I think you can also get one by subscribing to the Ars Technica “Ars Pro++” subscription. Or you could just buy one outright.
Install the prerequisites
I recommend using Chocolatey to install the required software. Follow the instructions to install Chocolatey if you don’t already have it. Then from an admin command prompt run the following:
Now you’ve got git (though lets be honest, if you’re following this doc then you already had git) and gpg4win installed, including Kleopatra.
Install Yubikey Manager from Yubico. There is a Chocolatey package for this (yubikey-manager) but at the time of writing it is behind the version available from Yubico (1.0.1 vs 0.5.2).
Initial Yubikey setup
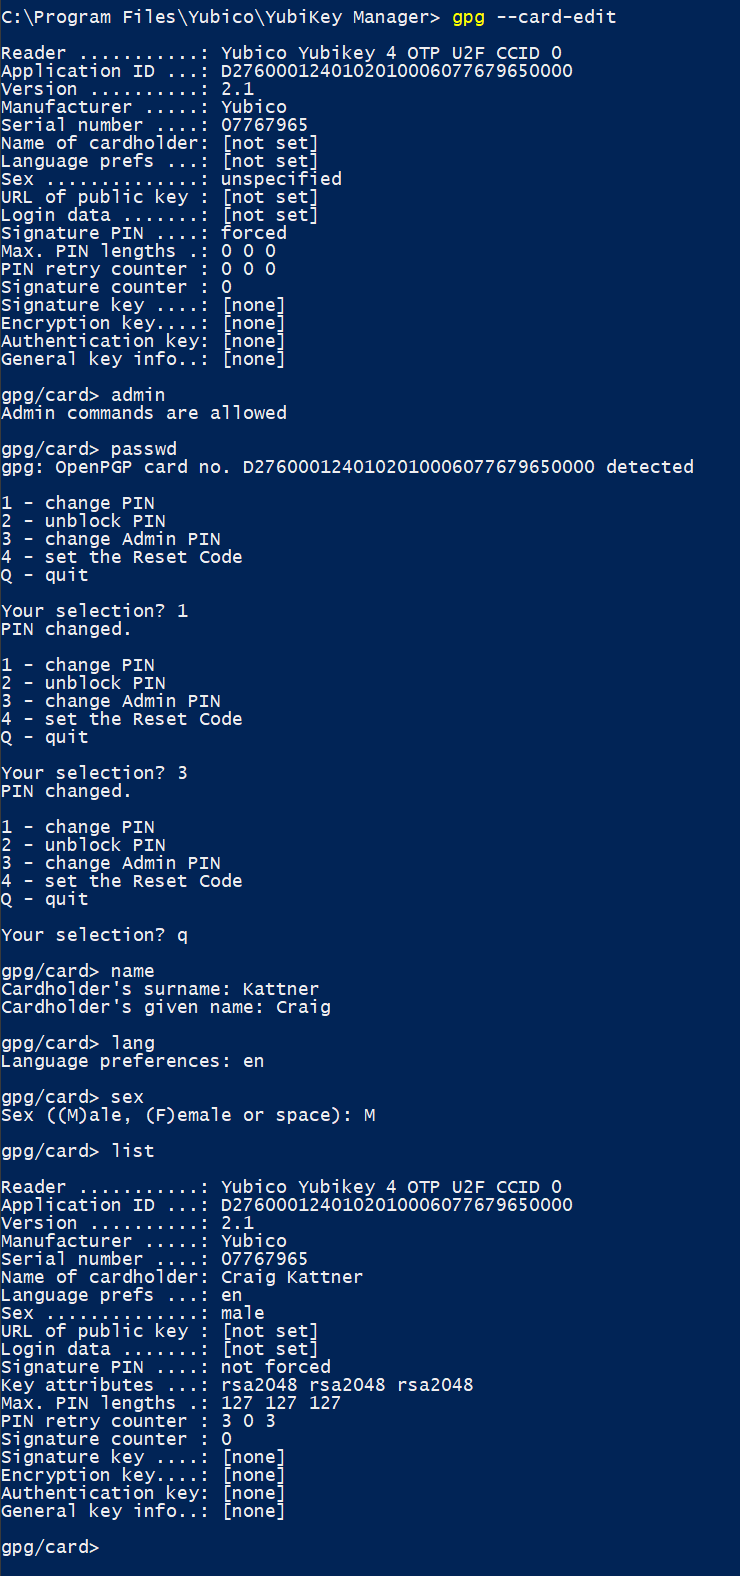
Out of the box the Yubikey will have an Admin PIN of 12345678 and a normal PIN of 123456. Clearly sticking with the defaults is unwise, so you should change the PINs. You can do so with the following procedure:
- Plug your Yubikey into an open USB port and then open a command prompt. Run this command
gpg --card-edit. - Run
adminto allow running of admin commands. - Run
passwdand choose1to set your PIN. You’ll be prompted to provide the current PIN (123456for a new Yubikey) and then to enter and confirm your new PIN. - Choose
3to set your Admin PIN. You will again be prompted for the current Admin PIN (12345678on a new Yubikey) and then to provide and confirm a new Admin PIN. - Type
qto leavepasswdmode. - Type
nameand enter your surname and given name. - Type
langand enter your two-character language code (enfor English). - Type
sexand enter M, F, or space for your choice.
Note that while it says “PIN” in reality it’s a passphrase (e.g. you are not limited to just a short sequence of digits).

Creating the private key on the Yubikey
But first, a caveat
I should preface this section by saying that I am no expert when it comes to protecting your certificate. There are strong arguments to be made that this is NOT the right approach, but since I just want to put my Yubikey to use, it’s the approach I’m going with.
If you’re looking for a more secure path (with proper backups to protect your online identity) then you should probably look into creating your keys using an offline device, making backups to USB storage devices (which are securily stored and not accessed by a non-air-gapped machine). The simplest path here is either an old computer that you boot up w/ some Linux Live CD distro or a Raspberry Pi.
I may find myself going down this road at some point for the simple fact that I actually now have a SECOND Yubikey and the method I outline below is unable to store the same key on the second USB device. If I want to have two Yubikeys w/ the same certs, then I need to create those certs on an intermediary device.
Just get on with it
So, disclaimers aside, here’s the procedure:
- Plug your Yubikey into an open USB port and then open a command prompt. Run this command
gpg --card-edit. - From shell enter
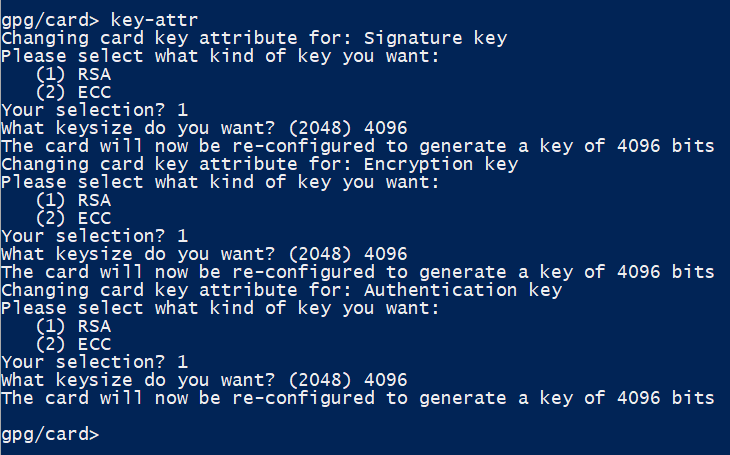
admin - If you want to change the key length, run
key-attr. You’ll be asked to specify the key length for a variety of different types of keys. I chose 4096 for all of them.
- Enter
generate. You’ll be prompted to specify if you want to make a backup or not. Note that if you chooseyesthen a SHIM will be installed on your computer, not that actual key! I said yes. You’ll need both the normal PIN and the Admin PIN for this step.- Specify how long you’d like the key to be valid. I choose 1 year, entering
1yat the prompt. - Provide your Real Name including both first and last names.
- Provide your Email Address. What value you put in here depends a bit on your github configuration. If you have enabled “Keep my email address private” and “Block command line pushes that expose my email” in your email configuration then you need to use the github-assigned “noreply” email address here. If you haven’t chosen to keep your email address private then you should choose an email address you have assigned to your account.
- I left the Comment blank.
- Provide a passphrase for your key and DON’T LOSE IT!
- Specify how long you’d like the key to be valid. I choose 1 year, entering
- Wait while the Yubikey generates a key. The green light on it will flash for a while.
- If you chose to back the key up, then check Kleopatra. You should see an entry for your new key.

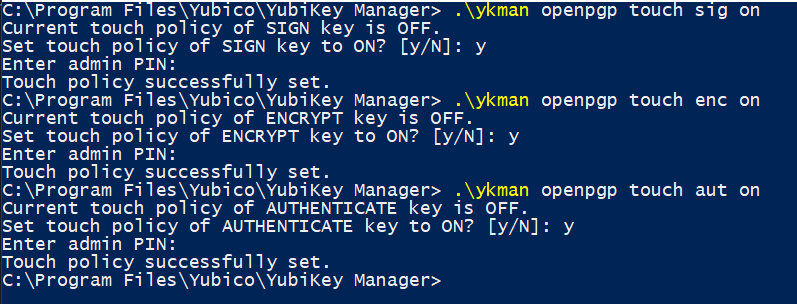
- Turn on require touch for signing
ykman openpgp touch sig on. You’ll probably have to CD into the direcotry where Yubikey Manager was installed to (C:\Program Files\Yubico\YubiKey Managerin my case). I also suggest requiring touch for other operations as well, to prevent any access that you don’t explicitly approve. You can do that with the commandsykman openpgp touch enc onandykman openpgp touch aut on. These commands will require the Admin PIN.
Load the public signing key on github
Now we’ve got all our keys created and securely stored on the Yubikey. Before the signing key can be used on github to verify our commits we need to load the public key on github.
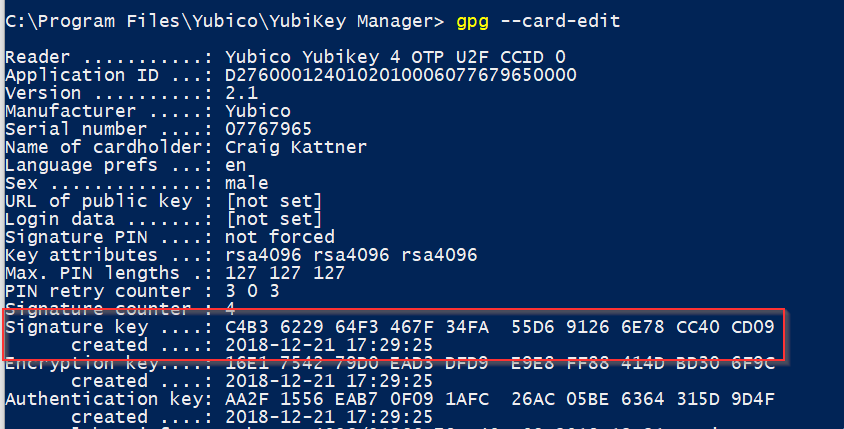
- Find your signing subkey. Run
gpg --card-editand you’ll be presented with a list of your keys. Look for theSignature keyline to get the ID of your signing key.
- Export the public key by running this command
gpg --armor --export <keyid>(remove the spaces from the key id). (You really only need the last 4 segments of the ID but I usually just grab them all.) The--armorparameter is so that we get the output in ASCII.
- Paste the resulting key into the GPG Keys section in Github. Click
New GPG Keyand then paste the entire output (including the BEGIN and END lines) of the prior command into the Key area. ClickAdd GPG Keyto save it. Notice that the Key ID here matches the key ID used above.
Configure your repo
We need to set a few options in git now.
- Git needs to know where to find the gpg executable. Run
git config --global gpg.program "c:\Program Files (x86)\GnuPG\bin\gpg.exe"using the path to your gpg program. - I want to sign all of my commits, so I also set an option to do so.
git config --global commit.gpgsign true. - We also have to tell git to use the email address that we’re using on github.
git config --global user.email 2313730+ckattner@users.noreply.github.com. - Finally we need to tell git about our signing key
git config --global user.signingkey <key id>.
Test it out
We’re almost home. We’ve got our key on our security device and we’ve told github about our public key. Now we just need to make a signed commit and then to push it to github.
- Commit something. I’m going to add a new, unpublished blog post to my repo. Stage your file and then commit it. If you’ve done everything correctly then you should be prompted for your PIN. After you provide the PIN then you’ll need to touch the button on the key in order for it to actually go ahead with the signing.
git commit -m "another signed test commit" - Now verify it was signed by reviewing your commit log with
git log --show-signature. If you did everything correctly there should be a line associated with this commit indicating a good signature.
- Now push the commit to github and verify it there.

That’s all folks
Now your commits to github are verifiably your own. Hopefully no one is out there trying to impersonate you, but if they are it just got a little bit harder for them.