Using Visual Studio Code for Arduino Development
In this post I will help you learn how to use VS Code to develop for the Arduino. The Arduino IDE is a thing that exists, but it’s far from a full featured development environment and VS Code includes many niceties to make the development process smoother and more developer-friendly.
Install your tools
As ever, we need to install some tools. There are a couple things to note here about what to install from where. First, while Arduino IDE is available on the Microsoft Store, I don’t recommend installing it from there. Doing so puts it ih a funky location which in turn makes configuring VS Code a little harder (and I presume makes it more difficult to keep it correctly configured). This being the case, I suggest installing Arduino IDE from Chocolatey, using choco install arduino command.
Next, we need VS Code. You can install it in a few ways as well from the stand alone system-level install to the user-install (which will keep itself up-to-date much like Chrome does) to chocolatey itself. Again I’m partial to Chocolatey, so choco install vscode gets it done.
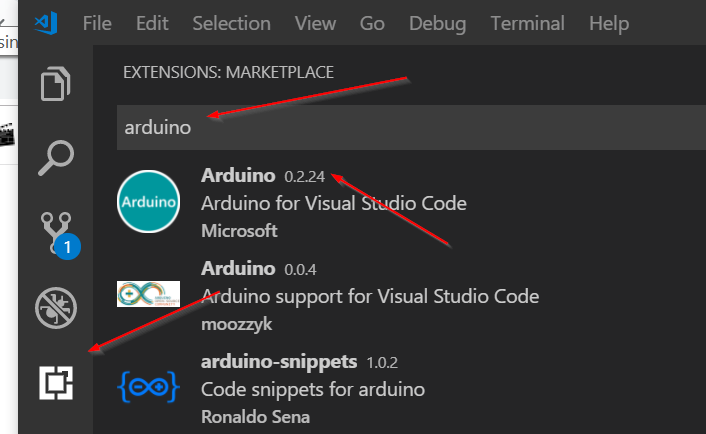
Now that we’ve got Code installed we want to find the Arduino extension and install it. Hit the “Extensions” button (it’s the square one) and type “Arduino” in the search box. Finally, choose the extension published by Microsoft and install it. 
When the install completes hit “Reload” to reload Code with the newly installed extension.
Setup a project
Once you’ve installed the extension then go ahead and open a new VS Code window (File -> New Window). From there, open a folder (File -> Open Folder). The folder you want to open is whereever it is you plan on creating your Arduino project. Once the folder is opened go to the Command Palette (ctrl + shift + p) and find “Arduino: Initialize” in the menu. This will stub out some initial Arduino project code for you, including an initial app.ino file. This file represents your applications source code, but I don’t believe it’s in an optimal location. Before doing anything, add a new folder to your project named src and then move the app.ino file into that folder.
Next, choose your board type. In the lower right part of the status bar you’ll see “<Select Board Type>”. That’s actually a button, so hit it and you’ll be able to select the type of board your project is for. In my case I’m using a Mega 2560 clone, so I chose “Arduino/Genuine Mega or Mega 2560” from the list.
If you have your device now, you can plug it in to your computer and the next option over is labeled “<Select Serial Port>” which is where you select the port to program the device. Select this option and you should see the port that has been assigned to your device.
Program your device
Now the easiest thing to do to check everything is probably to just flash the Blink example to your device. If you look at the Explorer window of your Arduino project you’ll see a section labeled “Arduino Examples.” Open that up and drill down to Built In Examples -> 01.Basics -> Blink. That’ll open up a new VS Code window. Copy all the text in that window and then go back to your project window. Open app.ino and paste that text in. We’re just copying it for now so we can prove that we can program our Arduino. Go to the Command Palette again and run “Arduino: Verify.” If it succeeds then try “Arduino: Upload” to load the code to your device. If all went to plan then the “L” should begin blinking on and off at one second intervals. Congratulations, you’ve programmed your Arduino!
So what’s next? Well, this is just my first foray into building my own Nixie tube clock. My next steps will be to start learning how to do more or less anything w/ an Arduino.